C++11 – Part 4: Template Tidbits

C++11 saw a bunch of changes to template handling that overall are fairly minor. The first two will I cover allow what seem fairly obvious things that I am sure most C++ programmers attempted when they were learning the language. The third is not really a language change in itself, but more of a method to help the compiler and linker do less work.

Right-angle Brackets
When specifying a template within a template, there is no longer a need to put a space between the “>“s. For example, a poor man’s matrix can now be specified as:

std::vector<std::vector<double>>

Not a big feature by any means, but a great improvement!

Template Aliases
There are limitations with typedef and templates. Specifically, typedef can only be used to define fully qualified types, so does not work in cases where you want to partially specialize a template. The standard example (as in, straight from the Standard) is if you want to provide your own allocator for a std::vector. Now you can define a type for that using:

template<class T>
  using Vec = std::vector<T, Alloc<T>>;
Vec<int> v;    // same as std::vector<int, Alloc<int>> v;

Note that ordinary type aliases can be declared using the using syntax instead of typedef, and in my opinion is a far nicer syntax.

Extern Templates
To understand this feature, you first need to have some idea about how C++ compilers deal with templates. Lets see if I can explain this correctly… Consider this code snippet:

Foo<int> f;
f.bar();

When the compiler reaches the first line, it does a implicit initialization of the constructor (and destructor) of Foo<int> (if it has not been done previously in this translation block). That is, it creates the code for the int version of Foo. Generating the code on usage makes sense with templates as we do not know what types will be used when we declare the class (hence the use of templates…). The second line accesses the bar() method of Foo<int> and so that function gets implicitly initialized.

A disadvantage of implicit initialization is that we would have to use every method to let the compiler catch issues when using a class with a particular type. Also, the initialize a bit here and there approach might be slower. To work around this we can do an explicit initialization of the class:

template class Foo<int>;

The disadvantage of this is that if you class has a method that is not usable for a particular type (e.g. due to a class method requiring an operator that is not implemented for the type), then an explicit initialization will try to initialize that method and fail. With implicit initialization, the methods are initialized as called and so the unusable method is never encountered by the compiler. This is all in C++03.

OK… more details about the compiler. What happens when we have two translation units that are compiled separately then linked together that both use the Foo<int>? At compile time, the compiler has no idea that both these files use the that class, so initializes it for both files as needed. Not only is this a waste of compiler time, but then the linker spots these two identical initializations and strips one out (ideally…), so it wastes linker time too. C++11 provides a way to deal with this. In one source file, Foo<int> gets explicitly initialized. Then in all remaining source files that link with this, template initialization can be suppressed using:

extern template class Foo<int>;

One potential use for this is creating a shared library. If you know the finite set of types your template class/function is going to be used for, you can provide a header with just the declarations and the required extern lines. In the library source, you provide the definitions and explicitly initialize them. That way, any users of your library will just have to include the header and they are done. The compiler will automatically not implicitly initialize anything.
Posted in C++11 on by Allan Comments Off on C++11 – Part 4: Template Tidbits

C++11 – Part 3: Range-Based For Loops

A fairly common thing to do with an array or container is to loop over its values. Consider the following loop for loop over a std::vector<int> v:

for(std::vector<int>::const_interator i = v.begin(); i != v.end(); ++i)

Based on what is already covered in this series, we can simplify this statement to:

for(auto i = v.begin(); i != v.end(); ++i)

That is already a big improvement, but there is the tedium of always specifying the begin and end values. This is where the new range-based for loop syntax comes in. The entire expression can be reduced to:

for(auto i : v)

Note that i in this syntax is not the iterator, but the value the iterator points to so there is no need to dereference it in the loop body. All standard loop control such as break and continue can be used as in a traditional loop. If you want to modify the variable (or avoid passing around large data types by value) and the underlying iterator supports it, you should make the loop variable a reference:

for(auto& i : v)

This syntax can be used for arrays and any container from the STL. You can also use it on your own containers provided a few conditions are met. Firstly it must have either both begin() and end() member functions, or have free standing begin() and end() functions that take it as a parameter. These functions need to return an iterator, which by definition is required to implement operator++(), operator!=() and operator*().

Posted in C++11 on by Allan Comments Off on C++11 – Part 3: Range-Based For Loops

C++11 – Part 2: Suffix Return Type Syntax

Welcome to part 2 of my ramblings about C++11. Note that all of these posts are in the C++11 category, so it is easy to go an read previous entries. This post is going to focus on a new syntax for declaring the return type of functions.

Lets go back to the example of calculating a dot product of two vectors given in the first post of this series:

template<class T, class U>
void dot_product(const vector<T> vt, const vector<U> vu)

Once it is calculated, we probably want to actually return the value! However, we do not know the type of the output. Using decltype seems the way to go. For example:

template<class T, class U>
decltype(vt[0] * vu[0]) dot_product(const vector<T> vt, const vector<U> vu);

However, there is an issue here… And it is not the fact that vt[0] might not exist if you provide a zero length vector, as that does not matter (I guess because the return type of the [] operator is known). Nor is it that the result might overflow the type of an individual multiplication – stop being picky about fake code! The issue is that we do not know what vt and vu are at that stage of the function declaration. You could use:

decltype(*(T*)(0)**(U*)(0))

but the less said about that the better… This is where a new (optional) function declaration syntax comes into play:

template<class T, class U>
auto dot_product(const vector<T> vt, const vector<U> vu) -> decltype(vt[0] * vu[0]);

Although useful for templates, this syntax is really about scope. For example, consider:

class Foo
{
public:
  enum Bar { FOO, BAR, BAZ };
  Bar getBar();
private:
  Bar bar;
};

When defining the function getBar(), the following is wrong:

Bar Foo::getBar() { /* ... */ }

as Bar is out of scope – at that stage we do not know we are in a method for the Foo class. That can be easily fixed in this case by using Foo::Bar as the return type, but that can get messy in more complex cases. Better to use:

auto Foo::getBar() -> Bar { /* ... */ }

Then by the time Bar is reached, we know we are in the scope of the Foo class.

Posted in C++11 on by Allan Comments Off on C++11 – Part 2: Suffix Return Type Syntax

C++11 – Part 1: Automatic Types

My C++ skills are getting a bit rusty as I have not done much programming in that language lately. So I thought what better way to refresh my skills and learn new stuff than to go through the C++11 changes and write something about them. I will not cover all additions and changes to the standard, but instead focus on those I am likely to use, (which means they must be implemented in GCC). And even those I do focus on, will likely miss some subtleties that I find unimportant (or more likely am unaware of…). For those wanting actual detail, a late working paper that is a near final draft of the C++11 standard can be downloaded here.

This first post is going to focus on type deduction and its uses.

auto
In C++98, you have to declare the type of every variable being used. C++11 introduces the auto keyword, which lets the compiler deduce the type of a variable given its initializer. So you could write:

auto x = 5;

and you would get that x is declared to be an int. Like everything in programming, there is times when you should use a feature and times when you should not… This is an example of a time where you should not. The use of auto should be reserved for situations where you really do not know the type of the result or that the type is unwieldy to write. For example:

template<class T, class U>
void dot_product(const vector<T> vt, const vector<U> vu)
{
  //...
  auto tmp = vt[i] * vu[i]
  //...
}

A bit of a contrived example, but it should be clear that the type of the result depends on the template parameters U and V so is unknown. I will get to the return type in the next post…

A more useful example where the type of the variable is known but unwieldy is:

std::vector<std::pair<std::string, int>> v;
//...
for(auto i = v.begin(), i != v.end(), ++i) {
//...

Here the type of i is known (std::vector<std::pair<std::string,int>>::const_iterator), but writing that would quickly become tedious and error prone. I guess most situations like this were previously handled with a typedef statement.

There are other uses of auto that will be covered in later posts when the relevant features are introduced.

decltype
The decltype operator takes an expression and returns it type. A trivial example:

int x = 5;
decltype(x) y = x;

This declares the variable y to have the same type as x. Of course you could use auto here (or preferably neither in this case…), but the use of decltype comes into its own when you actually need a type – for example, a return type, which will be covered in the second post in this series.

Classic Gaming – Part 3: Crystal Caves

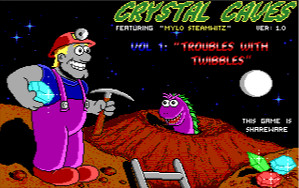
Ignoring everything I had said in the previous posts in this series about Commander Keen being next (stupid rat things still kill me…), I have instead worked my way though Crystal Caves.

Like many other Apogee software games, this came in three episodes – Trouble with Twibbles, Slugging it Out and Mylo Versus the Supernova – with the first game being free and the other two requiring a purchase. An interesting fact I found out about these games was that a patch was released for the original game 14 years and one day after its original release, fixing a bug when run on Windows XP. That is what I call support!

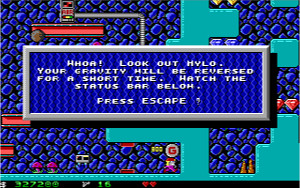
Meet our hero, Milo Steamwitz. He knows exactly how he is going to make his fortune, but needs to generate some money to invest first. So it is off to some remote planet where large crystals are just lying about in caves waiting to be harvested. You start off in some sort mine shaft that provides access to 16 caves to be explored. In each cave you have to run around, jumping between platforms, flicking switches on and collecting all the crystals while avoiding various obstacles and shooting aliens. Each cave has a bit of a theme to it, with some having continuously falling rocks to avoid and others having “low gravity” (which does not let you jump higher, but does mean you get forced back whenever you shoot – interesting…). Once all the crystals are collected, the exit door unlocks.

I had played the first episode many times when I was younger so I zoomed through to the end quite quickly. For each level there is a key that you can collect which allows you to open all the treasure chests scattered throughout the level, but having no siblings around to eliminate from the high-score board, my motivation to do so was limited… At the end of the first episode, Milo sells up his collected crystals and invests in a Twibble farm. It turns out that Twibbles are prolific at eating and breeding so the planets resources are soon used up. Also, no-one wants to buy Twibbles any more, so I guess he just abandoned them all to die of starvation.
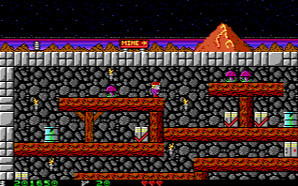
The second and third episodes are very similar to the first. I think there is a slight difficulty increase, but it is hard to judge given how much I had played the first episode previously. The difference I did notice was that a lot of levels required you to do the crystal collecting for different sections in a defined order. There were many places where the only way to go back to collect a crystal you missed was to die and restart the level. What is worse, there is a bug in the third game where in the mine shaft there is an area where you can not escape (pictured). So the two levels there must be left until last, otherwise you have to restart the game.
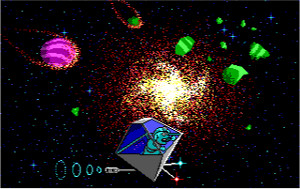
The second episode ends with Milo buying a slug farm. For some reason, everybody wants slugs and he is in danger of running out. But then the slugs burrowed underground to avoid the heat of the day and ended up in an old salt mine. So Milo’s profits quickly “dried up”. Oh, the hilarity…

The final episode see Milo giving up on farming. Instead he wants to buy a solar system to set up a vacation resort based on some perfectly legitimate sounding scheme he saw on TV. Sure enough, once he signs the contract, the whole solar system gets destroyed in a supernova (I bet you could have never guessed that would happen from the game title…). Luckily, the supernova left a nice looking backdrop for a space burger joint. It is now quite popular and Milo can sell his burgers at a price that looks expensive even accounting for inflation.

I was slightly disappointed at the lack of additional game-play elements in the second and third episodes. The two episodes I had not previously played were entertaining enough, but that is influenced by nostalgia. Overall, I think these games are worth playing, but if you finish the free episode and are not impressed, do not think things will improve.

So… will I finish Commander Keen: Vorticons for the next post? Not likely… But I am running out of ideas for old DOS games to play, so make me some suggestions.

Bad Robot

Tweet

The talking robot that I have assigned to my daughters education is teaching her wrong. Light-years measures distances not time.

Posted in Tweet on by Allan Comments Off on Bad Robot

Swimwear?

Tweet

Queensland Rail’s free Wi-Fi blocks kernel.org. I assume it falls under the “Hacking” category and not “Intimate Apparel and Swimwear”…

Posted in Tweet on by Allan Comments Off on Swimwear?

Installing Arch on a MacBook Pro (8.1)

My earlier post about installing Arch Linux on a MacBook Pro 5.5 is one of the most accessed posts on my site, so I figured I should write an update for the newer model.

The basic specs of my MacBook Pro 8.1 (13″) are:

  • Intel Core i7-2620M @ 2.7 GHz
  • 8GB (2x4GB) 1333MHz DDR3 SDRAM
  • 750GB SATA @ 5400 RPM
  • Intel HD Graphics 3000
  • Broadcom BCM4331 802.11a/b/h/n

Installation: I have gone for a pure x86_64 install this time. The initial install was “fun”… So much so, that I would have probably abandoned Arch altogether if I did not have a vested interest in it. The latest official Arch Linux install CD (2011.08.19) does not even boot so I had to grab a testing iso. The install is fairly routine as far as a single OS install on a MacBook Pro goes. I followed the same strategy as my previous install and changed the partition table format and blessed the partition /boot was on for a faster boot-up. I could have tried GRUB2 with its EFI support, but I just stuck with what I knew worked. But “worked” is a funny term as the current Arch Linux installer will only allow you to install GRUB on the hard-drives MBR and not onto an individual partiation (which is required on MacBook Pros). So I did my first manual GRUB installation and everything booted fine!

Video: Just pacman -S xf86-video-intel and everything works.

Screen Brightness: Worked out of the box.

Keyboard Backlight: I recommend learning to touch type… but I read it works.

Touchpad: Sort of worked out of the box using xf86-input-synaptics-1.5.99.902 (see my previous post about what I consider “bugs” in synaptics finger distance calculations). That includes two/three finger right/middle clicks and two finger scrolling. Also, click with thumb and drag with finger no longer required a patched kernel module.

Wifi: Requires b43-firmware from the AUR.

Suspend to RAM: I set xfce4-power-manager to suspend on lid close it worked fine.

Webcam: Worked out of the box.

Sound: Use alsamixer to unmute the speakers.

Keyboard: Screen brightness keys worked fine. Needed to add shortcuts to XFCE for volume control and disc eject.

Fan: Appears fine out of the box, but I need to test it under more variety of load.

Anything else (bluetooth, thunderbolt) has not been tested because “meh”.

Overall, this install took me far less time to do compared to installing on the 5.5 model. There were no patched modules for the touchpad or screen brightness control and no compiling a proprietary module for the wireless. In fact, after the initial dramas with the installation media, everything basically just worked. I guess some of the reason for that is that the 8.1 model I am using was released some time early in 2011, so many of the issues people may have faced early on appear to have already been fixed.

Converting Video On The Command Line

I recently acquired an iPad for work purposes… so the most important thing to know is how to convert video to play on it. Use handbrake, done – short blog post.

But, that would be all too simple. Often I want to watch an entire season of a show that I have collected from various sources over the years and these often have widely varying sound levels. That is quite annoying if you set the season to play and then have to adjust the volume for every episode.

Here is a simple guide to convert your videos into a format suitable for the iPad with equalized volumes. I somewhat deliberately used a variety of tools for illustration purposes, but I think the one I selected tended to be the quickest for each step. The following code snippets assume that your videos have extension “.avi”. They also destroy source files, so make a backup.

Step 1. Extract the audio track using mplayer:
for i in *.avi; do
  mplayer -dumpaudio "$i" -dumpfile "${i//avi}mp3"
done

Step 2. Make sure all audio is mp3 and convert using ffmpeg if not:
for i in *.mp3; do
  if ! file "$i" | grep -q "layer III"; then
    mv "$i" "$i.orig"
    ffmpeg -i "$i.orig" "$i"
    rm "$i.orig"
  fi
done

Step 3. Normalize the audio levels using mp3gain:
mp3gain -r *.mp3

Step 4. Stick the adjusted audio back into the video file using mencoder (part of mplayer):
for i in *.avi; do
   mv "$i" "$i.orig"
  mencoder -audiofile "${i//avi}mp3" "$i.orig" -o "$i" -ovc copy -oac copy
  rm "$i.orig" "${i//avi}mp3"
done

Step 5. Convert to iPad format using the command line version of handbrake:
for i in *.avi; do
  HandBrakeCLI -i "$i" -o "${i//avi/m4v}" --preset="iPad"
  rm "$i"
done

This is probably not the most efficient way of doing this and will become less so once handbrake can normalize volume levels by itself (which appears to be being somewhat worked on by its developers…). But when you have several seasons of a show, each with more than 50 episodes (only a few minutes each), you quickly become glad to be able to make a simple script to do the conversion automatically.

Getting My Touchpad Back To A Usable State

I was happy to note the following in the release announcement of xf86-input-synaptics-1.5.99.901:

“… the most notable features are the addition of multitouch support and support for ClickPads.”

As a MacBook Pro user, that sounded just what I needed. No more patching the bcm5974 module to have some basic drag-and-drop support. I upgraded and everything seemed to work… for a while. I began noticing weird things occurring when I was trying to right and middle click (being a two and three finger click respectively). Specifically, my fingers would sometimes be registered in a click and sometimes not.

The two finger “right” click was easy enough to figure out. If my fingers were too far apart, the two finger click was not registered. It turns out I am what I have decided to call a “finger-spreader”, as my fingers can be quite relaxed across the touchpad when I click. Fair enough, I thought… I just have to train myself to click with my fingers closer together. Then came the three finger click. All three fingers close together did not seem to register as anything. A bit of spreading and a three finger click got registered, but too much spreading and it was down to two fingers. Also, it was not actual distance between fingers that mattered as rotating my hand on the touchpad with my fingers the same distance apart could result in different types of clicks registered.

A bit of looking in the xf86-input-synaptics git shortlog lead me to this commit as a likely candidate for my issues. The commit summary starting with “Guess” and it having a comment labelled “FIXME” were the give-aways… The first thing I noticed was that the calculation of the maximum distance between fingers to register as a multitouch click was done in terms of percentage of touchpad size. That means that the acceptable region where your two fingers need to be for a two finger click is an ellipse, which at least explains why physical distance appeared not to matter.

Attempted fix #1 was to increase the maximum allowed separation between fingers from 30% to 50%. That worked brilliant for two finger clicking, but made three finger clicking even worse, which lead me to another interesting discovery… The number of fingers being used is calculated as the number of pairs of fingers within the maximum separation, plus one. For two fingers, fingers 1 and 2 form one pair, plus one is “two fingers”. However, for three fingers, there are three possible pairs: (1,2), (2,3) and (1,3). This explains the weirdness in three finger clicking; finger pairs (1,2) and (2,3) must be withing the maximum allowed separation while finger pair (1,3) must be outside that. That explains why having fingers too close together did not register as a three finger click (as it was being reported as four fingers – three pairs plus one) and why things became worse when I increased the maximum allowed separation. I filed a bug report upstream and a patch to fix that quickly appeared.

After applying that patch, multifinger clicks all work fine provided your fingers are close enough together. I do not find the required finger closeness natural so I got rid of the finger distance restrictions altogether using this patch. I am not entirely sure what I break removing that, but it appears to be something I do not use as I have not noticed an issues so far. As always, use at your own risk…

Edit: 2012-05-21 – Updated patch for xf86-input-synaptics-1.6.1