MBP Fan Daemon Update

For those using my simple MacBook Pro fan daemon, you probably want to check that it still works… At least on my system, the location of the core temperature measurements have changed from /sys/devices/platform/coretemp.{0,1}/temp1_input to /sys/devices/platform/coretemp.0/temp{2,3}_input. I think this occured with the update to Linux 3.0 (but I am too lazy to confirm that is the actual update to blame…).

If you also have this change, you can grab an updated version of the daemon here. As always, it is only tested on my machine (MBP 5.5 13″), so it may not work anywhere else without adjustment…

Syncing Files Across SFTP With LFTP

My webhost only provides SFTP access (which is not surprising given what I pay…). But this can become annoying for maintaining things like a package repository where I would like to keep the remote files in sync with my local copy. My first thought was to go with a FUSE based solution in combination with rsync. Looking into the current best options to mount the remote directory (probably sshfs), I was eventually lead to LftpFS and on to its underlying software LFTP.

LFTP is a sophisticate command-line file transfer program with its own shell-like command syntax. This allows syncing from my local repo copy to the remote server in a single command:

lftp -c "open -u <user>,<password> <host url>; mirror -c -e -R -L <path from> <path to>"

The -c flag tell LFTP to run the following commands (separated by a semicolon). I use two commands; the open command (should be obvious what it does…) and a mirror command. The only real “trick” there is to add -L to the mirror command, which makes symlinks be uploaded as the files they point to. This is required as the FTP protocol does not support symlinks and repo-add generates some.

That was exactly what I needed and it makes a nice bash alias being a single command.

Local WordPress Install On Arch Linux

After the WordPress update from 3.1.3 to 3.1.4 unexpectedly broke one of the plugins I use (My Link Order – why this was removed as a native feature in WordPress is beyond me…), I decided it was time to actually test updates locally before I pushed them to my site. That would also allow me to locally test theme changes and new plugins rather than just doing it live and attempting to quickly revert all breakages I made. It is still not the worlds best testing set-up as it does not use the same web server, PHP or MySQL version as my host, but I am fairly happy assuming the basics of WordPress will be compatibly with what my host provides and so only really need to test functionality that should not be affected by such differences.

Note I decided to go with Nginx as the web server as it seemed an easy way to go. I also did not use the WordPress package provided in the Arch Linux repos as it kind of defeats the whole purpose of testing the upgrade, requires slightly more set-up in nginx.conf and I think files in /srv/http should not be managed by the package manager (but that is another rant…).

So here is a super-quick ten-step guide to getting a local WordPress install up and running.

  • pacman -S nginx php-fpm mysql
  • Adjust /etc/nginx/conf/nginx.conf to enable PHP as described here
  • Enable the mysql.so and mysqli.so extensions in /etc/php/php.ini
  • sudo rc.d start mysqld php-fpm nginx
  • If this is your first MySQL install, run sudo mysql_secure_installation
  • Give yourself permission to write to /srv/http/nginx
  • Download and extract the WordPress tarball into /srv/http/nginx
  • Create the MySQL database and user as described here
  • Adjust the wp-config.php file as needed (see here)
  • Point your browser at http://127.0.0.1/wp-admin/install.php

And it is done! I have not attempted to set-up the auto-update features in WordPress as that involves either setting up and FTP or SSH server and I have no need to do either on my laptop.

As a bonus, I can now draft blog posts while offline and preview them with all their formatting. So you can all look forward to more rambling posts here from me…

The “python2” PEP

When Arch Linux switched its /usr/bin/python from python-2.x to python-3.x, it caused a little controversy… There were rumours that it had been decided upstream that /usr/bin/python would always point at a python-2.x install (although what version that should be was unclear). Although these rumours were abundant and so more than likely such a discussion did occur (probably offline at PyCon 2009), this decision was never documented. Also, whether such a decision can formally be made off the main development list is debatable.

Enter PEP 394. Depending on how I am feeling, I call this the “justify Arch’s treatment of python” PEP or the “make Debian include a python2 symlink” PEP. Either way, the basic outcome is:

  • python2 will refer to some version of Python 2.x
  • python3 will refer to some version of Python 3.x
  • python should refer to the same target as python2 but may refer to python3 on some bleeding edge distributions

The PEP is still labeled as a draft, but all discussion is over as far as I can tell and I think it will probably be accepted without much of any further modification. The upshot is, using “#!/usr/bin/env python2” and “#!/usr/bin/env python3” in your code will become the gold standard (unless of course you code can run on both python-2.x and python-3.x). There is still no guarantee what versions of python-2.x or python-3.x you will get, but it is better than nothing…

One recommendation made by the PEP is that all distribution packages use the python2/python3 convention. That means the packages containing python-3.x code in Arch should have their shebangs changed to point at python3 rather than python. Given our experience doing the same thing with python2, this should not be too hard to achieve and is something that we should do once the PEP is out of draft stage. This has a couple of advantages. Firstly, we will likely get more success with upstream developers preparing their software to have a versioned python in their shebangs (or at least change all of them when installing with PYTHON=python2 ...). That would remove many sed lines from our PKGBUILDs. Secondly, if all packages only use python2 or python3, then the only use of the /usr/bin/python symlink would be interactively. That would mean that a system administrator could potentially change that symlink to point at any version of python that they wished.

Python 3 Module Support

I was reading a thread on the python-dev mailing list where someone asked about ideas for porting modules to python-3.x. That lead me to wonder what the current status of python-3 support was in various well used modules. So here is a summary of my research. As a disclaimer, I have not directly asked any of the involved module developers what their opinion is, but have rather summarised what I can find posted on various mailing lists. Also, the modules I list are my own subjective selection of what I think are popular modules, so do not take inclusion/exclusion in this list to mean anything.

GUI Toolkits:

PyQt – Has supported python-3 since v4.5 (release 2009-06-05).

PyGTK – Is effectively going to be a dead project with the upcoming release of GTK+3 so will not be ported to python-3. Instead, projects should move to PyGObject, which has some limited python-3 support with v2.26.0 (base and Introspection modules only – released 2010-09-27)

wxPython – python-3 support has not been started and according to their roadmap will likely be on hold until a major rewrite is finished.

Science:

numpy – Supports python-2 and python-3 from a single code base since v1.5.0 (released 2010-08-31), although the module needed for its testing framework (python-nose) is not yet officially ported.

scipy – Will support python-3 with the release of v0.9.0. As far as I can tell, python-3 support is finished in their SVN.

matplotlib – I could not find any details on the current status of python-3 support for matplotlib, so I assume this has yet to start. The porting of numpy to python-3 should give this a huge boost.

Database:

pysqlite – the sqlite module has been part of the Python stdlib for a while now, so has supported python-3 from the beginning. I guess the external development version has similar support.

psycopg2 – This is actually quite a weird situation… It appears to have been ported at the end of 2008 and looking at the patch should have been able to simulataneously support python-2 and python-3. However, when it got applied to the master git branch in mid 2009, a python2 branch was immediately created and all development for the last 18 months has occurred on that branch.

mysql-python – An old blog post indicates there is a rewrite happening and python-3.x support will be added once this starts shaping up to beta level.

Misc:

distribute – Supported python-3 since v0.6.2 (released 2009-09-26).

Django – The FAQ indicates they believe porting to python-3 will require dropping support for older python-2.x versions. According to mailing lists posts I could find, they intend to support the main python version that is used by a currently supported RHEL, so it could take quite some time before they do this. However, an initial porting effort showed that quite some progress could be made without having to drop support for current python-2.x versions.

PIL – The release notes for 1.1.7 states that “A version of 1.1.7 for 3.X will be released later”, but that was posted on 2009-11-15 and there is a lack of further updates on its status.

pygame – Some python-3 support was available in 1.9.0 (released 2009-07-31) and the number of modules that work with python-3 looks set to markedly increase with 1.9.2 (due to numpy now being python-3 compatible). Its successor (pgreloaded) similarly supports python-3.

Twisted – There is a python-3.x milestone in their bug tracker, but there appears to be no dedicated porting effort. Having a quick look at its dependencies, there may need to be some downstream work before it is started anyway. Also, their buildbot that uses the “-3″ warnings flag shows there is a lot of groundwork to be done.

So depending on exactly what you want to do, python-3.x might be an option. Graphical application programming, scientific programming and gaming all have reasonable support currently and that only looks set to get better in the near future. However, if you want to do anything web based or interact with a database other than MySQL, it looks like python-3 support could be quite some time away.
Posted in Software on by Allan Comments Off on Python 3 Module Support

When Good Features Go Bad!

Sometimes people have really good ideas of features that should be included in software that end up having unintended side effects. This is one of those stories.

Enter Liferea, probably the best RSS feed reader written in GTK2. You can tell it is good because they provide links to alternative feed readers on their front page… that shows confidence!

But it has one “feature” that has had me tearing my hair out. Whenever it checks a feed and encounters a redirect, it blindly updates the feeds URL. While that seems a good idea (as it prevents constant redirects), it causes some issues… Imagine opening your feed reader in a hotel with a paywall or terms of service page where you have to agree to go any further and all your feeds get their URL changed.

When that happened to me, I grabbed the source code and deleted the entire URL update segment. Given the Arch policies on patching and upstream issues, this is the sort of “fix” that would not make it into our repos so I have had to maintain my own Liferea package for a few months now. But that is all to change with a patch being accepted upstream. Of course, the patch does things the correct way and updates URLs that redirect only with HTTP 301 (Moved Permanently) codes.

So now I just have to trust that hotels do not issue a 301 codes to their paywall. For some reason, I am still worried…

Recovering Files From an NTFS Drive

Important lessons for computers owners:

  1. Set up a backup system
  2. Use that backup system regularly

It turns out that while I set up a backup system for my wife’s computer, the last time it was ran was sometime late 2009… So when the primary Windows partition on that computer no longer booted; was not recognised as a Windows install by the Windows install CD rescue option; and would not mount using the ntfs-3g driver from Linux, I knew I was in trouble! Luckily, I had split the Windows install to have a separate partition where most of her data (photos, music, documents) were sitting and that partition was still mountable. So, in the worst case scenario, the total damage would be limited to Firefox and Thunderbird profiles and whatever was saved on the desktop.

Recovering more data from the hard-drive was not particularly difficult as the hard-drive still basically worked. In that case, the first step in any data recovery attempt is to create a disk image of the broken partition. This prevents any further damage to the hard-drive making you life worse. A good tool for the job is GNU ddrescure (which may be named ddrescue or gddrescue depending on your Linux distribution). Make sure you have the GNU version as the other software with the same name is less user friendly. It can take a long time to take an image of a hard-drive so having some nice output and being able to stop and restart at any stage are quite essential. Creating an image is as simple as running (as root):

ddrescue -r3 /dev/sda2 imagefile logfile
The log file shows that the hard-drive had quite a few corrupt parts, all relatively small and close together so my guess is some sort of physical damage preventing those being read.

# Rescue Logfile. Created by GNU ddrescue version 1.13
# Command line: ddrescue -r3 /dev/sda2 imagefile logfile
# current_pos current_status
0x30D31E00 +
# pos size status
0x00000000 0x309EB000 +
0x309EB000 0x00001000 -
0x309EC000 0x00073000 +
0x30A5F000 0x00002000 -
0x30A61000 0x00073000 +
0x30AD4000 0x00002000 -
0x30AD6000 0x00073000 +
0x30B49000 0x00002000 -
0x30B4B000 0x000FC000 +
0x30C47000 0x00001000 -
0x30C48000 0x00074000 +
0x30CBC000 0x00001000 -
0x30CBD000 0x00074000 +
0x30D31000 0x00001000 -
0x30D32000 0x7F5409E00 +

So now you have an image of your hard-drive, it is time to get those files out. Given the disk image was relatively complete, I went for software called Sleuth Kit. It has a frontend called Autopsy, which I found fairly useless apart from browsing the data. To use it, start Autopsy by pointing it at directory where all its files are to be stored and then point your web browser at the relevant place:

mkdir autopsydir
autopsy -d autopsydir
firefox http://localhost:9999/autopsy

While browsing the data was good to confirm that most of the files I wanted were still there, I just wanted to extract every single file possible from the image and I would then copy all the relevant stuff over to the new computer as necessary. Slueth Kit has some command-line tools for doing that; fls for listing files and icat for getting them. Using these, you can extract the files one at a time… but a simple script will automate extracting everything.

#!/bin/sh
IMAGE=../imagefile
fls -urp $IMAGE |
while read type inode name; do
   echo $name
   case $type in
      d/d) mkdir -p "$name" ;;
      r/r) [ ! -f "$name" ] && icat $IMAGE $(echo $inode | sed 's/://g') > "$name" ;;
   esac
done

That will take a long time to run, especially if it is your primary Windows install drive as it will have lots of small files to extract. So I made that script so that it can continue where it left off. Just do not stop one run in the middle of an important file or it will not finish extracting it. You might want to also touch hiberfil.sys and pagefile.sys in the extraction directory first as they are relatively useless and will take up a few gigabytes each.

So everything appears to have been recovered and I survived the lack of backup! Windows 7 has a good feature that reminds you to set up a backup and run it regularly, so hopefully I will not need to do this again.

Posted in Software on by Allan Comments Off on Recovering Files From an NTFS Drive

GCC in C++

As is becoming widely covered, the GCC Steering Committee and the FSF have approved the use of C++ in the GCC codebase. This is not a particularly sudden decision… I originally saw this proposed by Ian Lance Taylor on his blog a couple of years ago. He also has some good slides about how using C++ would be benificial. There was a gcc-in-c++ branch that corrected incompatibilities flagged by -Wc++-compat, but I think this is mostly merged and there is now an experimental --enable-build-with-cxx configure flag. So I think that this decision comes at no real surprise to anyone involved.

I think this is a great idea! Why? Because if the compiler is written in C++, then the compiler developers have more motivation to make C++ compilation faster. This is good for me as C++ is my primary choice for a writing in a compiled programming language. So this is a win for me.

Is it a win for GCC? I know some people (especially Linus Torvalds) think using C++ for anything is a major disaster. In fact, despite being a C++ proponent, I tend to agree… 99% of people who propose the usage of C++ for something are wrong. Many of the complexities in C++ have no place in most projects and too many C++ programmers feel the need to use the entire C++ toolset. Let be honest, the curiously recurring template pattern and template metaprogramming have no real place anywhere but in academia[1]. But (single) inheritance and the STL do provide what I have seen people try to replicate in C many times. Using C++ as a C with classes is not really that different from C but it can be much simpler to write.

There are some obvious cases where changing to C++ in the GCC codebase would be of great benefit. Take a look in gcc/vec.h in the gcc source.

/* The macros here implement a set of templated vector types and
associated interfaces. These templates are implemented with
macros, as we're not in C++ land. The interface functions are
typesafe and use static inline functions, sometimes backed by
out-of-line generic functions. ...

That is screaming out to be replaced by a std::vector. There are other examples where simple inheritance is mimicked using a slew of (un)defines and switch statements. Some of these are so complex, I wonder whether there will be any performance loss due to the introduction of virtual function calls. Certainly, it will be a win in terms of maintainability.

[1] Although in combination you get the expression template paradigm, which allows you to build a really nice numeric vector class that unrolls all loops at compile time and does not suffer from virtual function overhead, making it as fast as manually programming the vector arithmetic in C but much more convenient to use. Then you go back to using std::valarray which is close enough…

Thunderbird vs Exchange IMAP

I was having issues with attachments only being partially downloaded in Thunderbird from an IMAP account on a MS Exchange server (2003 I think). Turns out I ran into a very old Thunderbird bug (filed 2001-07-24). MS Exchange by default does not return the actual size to the IMAP4 command “FETCH RFC822.SIZE”. This is deliberate as it provides a nice perfomance advantage.

So… like a good Linux user I should once again blame Microsoft software for being broken? Not this time. It turns out section 3.4.5 of RFC 2683 (IMAP4 Implementation Recommendations) says that the RCF822.SIZE value should only used for things like providing estimates to the user and not for allocating buffers and the like. Bad Thunderbird!

The work around is to go to Preferences > Advanced > Config Editor… and set mail.server.default.fetch_by_chunks to FALSE. Old emails will need to be redownloaded to fix the attachments.

Simple MacBook Pro Fan Daemon

The fan control on the MacBook Pro under Linux is not the best… I would say it does not work at all but I once saw the fan speed increase slightly on its own so it appears to do something, sometimes, according to some logic I can not figure out.

It turns out that taking “manual” control of the fan is quite easy. A simple

echo 1 > /sys/devices/platform/applesmc.768/fan1_manual
sets the fan to manual mode. Then you can adjust fan1_output in the same directory to set the current fan speed. Do not get confused with fan1_input, as that is strangely the actual fan speed! The minimum and maximum speeds are given by fan1_min and fan1_max. If the minimum speed is reported as 0 or 1, ignore it. For MacBook Pros with Core 2 Duo processors the minimum fan speed should be 2000. The maximum fan speed is 6200.

So now that we know how to control the fan, we just need some sort of algorithm to choose what the fan speed should be based on the temperature. The MacBook Pro has a whole bunch of temperature sensors, but the ones that matter are for the processors as they are always the highest. These are found in /sys/devices/platform/coretemp.{0,1}/temp1_input (you may need to load the coretemp module). Montoring these during basic usage shows the average temperatures of the two processors is around 40-45C during idle, 50-55C with basic web browsing and 60-65C when watching a HD movie (at least in warm Australian ambient temperatures).

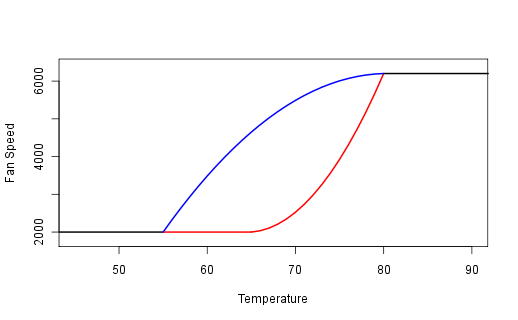
To save battery on a laptop, I think that the fan should not come on when the computer is doing anything less intensive than watching a movie, so I set that fan to kick in at 65C. This coincides with what Mac OSX does. From OSX, it appears that the fans should hit full speed at 80C and the speed builds up exponentially to that point. The formula I use for changing the fan speed when the temperature is increasing is:

temp <= 65:
   speed = max(current_speed, 2000)
65 < temp < 80:
   step = (6200 - 2000) / ( (80 - 65) * (80 - 64) / 2 )
   speed = max(current_speed, ceil(2000 + (temp - 65) * (temp - 64) / 2 * step))
temp >= 80:
   speed = 6200

When the temperature is decreasing, I prefer to keep the fan going slightly longer to force the temperature down to low levels as quickly as possible. I push it back down to 55C using this formula:

temp >= 80:
   speed = 6200
55 < temp < 80:
   step = (6200 - 2000) / ( (80 - 55) * (80 - 54) / 2 )
   speed = min(current_speed, floor(6200 - (80 - temp) * (81 - temp) / 2 * step)
temp <= 55:
   speed = 2000

Here is a graphic of what that looks like (red = increasing, blue = decreasing):

fan speed

Grap the source code here. It assumes two processors and a single fan (not true for all MacBook Pros…). For Arch Linux users, there is also a PKGBUILD and daemon (mbpfan) for ease of use. I am lazy, so there is very little error checking in the code. It works for me but use at your own risk…

Update (2011-08-11): MBP Fan Daemon Update